Some advice on reproducing figures
Some advice on reproducing figures
This work stems from my experience reproducing Figure 1 (shown below) from Froner et al. (2013), using python, and from my desire to give some advice on the reproducibility process. In the following I suggest six steps to reproduce figures from publications.
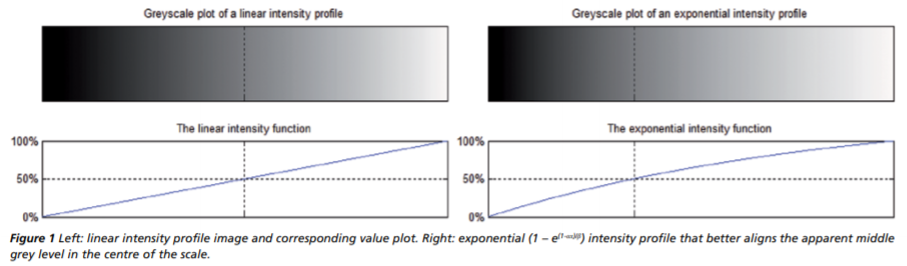
Figure 1 - xxxxxxx
Step 1. Get permission. Before embarking into a project, if you think you will need the original data, ask for permission to use it, to get the lay of the land. If that is not possible, and if you cannot make up similar data, this may not be the right project for you. Conversely, if you can work with made-up or modelled data, ask for permission to show the original figure alongside the reproduced one. I have requested permission to reuse figures many times, both from publishers and from professional societies, and have never received a negative response. For this chapter, I got a response from the European Association of Geoscientists and Engineers (EAGE) in less than 24 hours, granting permission to show the original figure both in the notebook and in the book. The Society of Exploration Geophysicists (SEG) follows the permission guidelines from the International Association of Scientific, Technical, and Medical Publishers (STM), granting republication rights for up to 3 figures (and other contents) without the need for explicit permission.
Step 2. Figure out the math. Define, study and test the equations, functions, and other computations necessary to replicate the figure. Often times I start with an online graph tool like Desmos (at: https://www.desmos.com/calculator). I study each parameter both with large ranges of values, to understand their full impact, and subsequently in the specific ranges required to reproduce the figure, and try to come up with sensible default values when necessary. I later replicate the whole process in a Jupyter notebook with interactive widgets, for this case see: Interactive parameter exploration exponential function.
Step 3. Get the plots right. Figure out the specific plotting stuff to replicate the figure and the best library or libraries to get it done. In this work, I used the python library matplotlib to plot this figure. To get it right, apart from plotting I recognized I needed, among other things, to:
Perform color space conversions
Plot the Lightness magnitude of the colormap as a line
Get the index, or colormap sample number, corresponding to 50% lightness
The first two items I’d already figured out for my Geophysical tutorial How to evaluate and compare colormaps. For the last item, the function numpy.searchsorted provided the solution. The figure below shows the result.

Figure 2 -
You can work through the entire process in the notebook How to make exponential grayscale.
Step 4. Test the results. Test on the data that come with the paper, if you got permission, or other data, either made up or real. In this case I tested the colormap on a time slice from the Netherlands F3 open seismic dataset (available here).
Step 5. Do some extra work. Go further, improve the plots or add interactivity so that others can experiment too. For example: to improve on the original figure I made the Lightness plot color change in parallel with the colormap, rather than being just one color. Also, I made a separate interactive notebook, where the colorbar plot, Lightness profile plot, and seismic time slice plot are updated in real time so that users can experiment with the parameters and make their own colormap.
Step 6. Pay it forward. Share your results. More than that, do it with a permissive license, ideally a Creative Commons Attribution (CC-BY). In my case, I am clearly identifying the original figure as copyrighted material, reused with permission, and my figure and the notebooks as CC-BY, which allows others to distribute, remix, adapt, and build upon the original work, even commercially, as long as proper credit be is given for the original creation.
In the end, have fun with it. For me, it was a wonderful experience, and empowering. To quote from Matt Hall’s slides: “…now I can read an article in Geophysics, or The Leading Edge, and - assuming the authors reveal their methods openly - I can try them out immediately on my own data. I can improvise, tweak and improve. This is powerful: Now I can test ideas on the fly… I am free!”
Reference Froner, B., Purves, S., Lowell, J., and Henderson, J. (2013). Perception of visual information: The role of colour in seismic interpretation. First Break, 31(4), 29-34. doi: 10.3997/1365-2397.2013010.